

 Try for Free
 Try for Free
Last updated on 2025-10-27, by
How to Record Live Shows, Sports, and Movies on YouTube TV
Summary:
YouTube TV is a streaming TV service that offers live shows on over 80 channels. It has a powerful DVR function with unlimited cloud storage space. So, do you know how to record live shows, sports and movies on YouTube TV? If you’re not familiar with it, be sure to read my article.

MenuCLOSE
Part 1: Can You Record on YouTube TV?
All you need to do is use the built-in DVR of YouTube TV to record on YouTube TV. After subscribing to YouTube TV, you don’t need to spend any extra money or purchase any additional hardware devices. You will automatically obtain the DVR function with unlimited storage space. This function is easy to operate and allows you to easily record your favorite live shows, sports programs, or movies on YouTube TV. To help you better understand this function, I will introduce its features in detail.
Unlimited cloud storage
Traditional DVRs are limited by physical hard drives, but YouTube TV DVR is different. It allows you to add unlimited programs to the database, and it doesn’t occupy space on the local device. Instead, it is saved in the cloud, so you don’t need to worry about insufficient space.
Retention period of nine months
All the recorded content will be retained by YouTube TV for nine months. This ensures you have sufficient time to watch it. It should be noted that if the retention period exceeds nine months, YouTube TV will delete your recorded content.
Support six accounts
Each main account can create up to 6 independent profiles, and each profile has its own DVR storage space. Each account can be personalized, and users can also customize the channel guide to arrange channels according to their own preferences, making it convenient to search for and record programs based on personal preferences.
Play multiple streams simultaneously
Youtube TV supports up to three simultaneous streams per account. Three devices can watch DVR content at the same time.
Fast-forward the advertisement
When watching the content recorded by the DVR, you can skip the advertisements to save your viewing time. You can also pause, rewind and Fast-forwarding and other operations.

Part 2: How to Record on YouTube TV Officially?
From the features of the DVR, it is easy to see that this function is very practical. It enables you to easily record your favorite programs and no longer miss any exciting content due to the inability to watch them in real time. Moreover, as long as you record the programs in the library, the subsequent updated content of those programs will also be automatically saved in the library. The recorded content can be watched simultaneously on up to three devices, allowing you to watch the programs flexibly at any time. So, if you don’t want to miss any exciting programs and want to know how do you record on youtube TV. please follow my step-by-step instructions to learn how to record YouTube TV.
Step 1:Open TV.youtube.com and log in.
You can access TV.youtube.com or open the YouTube app on devices such as smartphones. Then log in to your account.

Step 2:Search and Add
Click the magnifying glass icon in the upper right corner of the interface, then enter the name of the live broadcast, event or movie you want to record in the search bar. Next, click the “+” button next to the program name. The system will automatically record the current and future episodes of this program.

Step 3:Review the content
Click on the “LIBRARY” option in the top navigation menu, and you will be able to view the content you have recorded, as well as see the progress bar for the recording.

Can you record on youtube TV now? Before you start recording yourself, I must tell you that although the DVR is so convenient, it also has some cons. To help you to know how to record shows on youtube TV by use the DVR properly, I will explain its pros and cons in detail.
Pros:
- Automatically recorded and updated. Once you add the program to the database, there is no need to manually add each episode one by one. It will automatically update the latest content.
- Cross-device viewing is also fully synchronized. No matter which device you use to record and watch the program, the progress bar will remain synchronized, making it convenient and quick to watch.
- When you use other devices, record multiple programs simultaneously. You can record multiple live broadcasts at the same time without worrying about time conflicts.
Cons:
- There is a limit to the storage duration. The recorded content will be automatically saved for nine months. However, if the storage time exceeds nine months, it will be automatically deleted.
- Recording is restricted. Some programs are protected by copyright or are subject to the regulations of the channel provider and may not be recorded.
- Continuous subscription is required. You can only use the DVR while you are subscribed to YouTube TV. If you stop the subscription, the previously recorded content will no longer be available for viewing.
- Offline viewing is not supported. Since it is in the cloud mode, it offers cloud recording and cloud storage. Therefore, the programs recorded through the DVR cannot be downloaded to the local device for offline viewing.
Part 3: How to Record on YouTube TV with Video Recorder ?
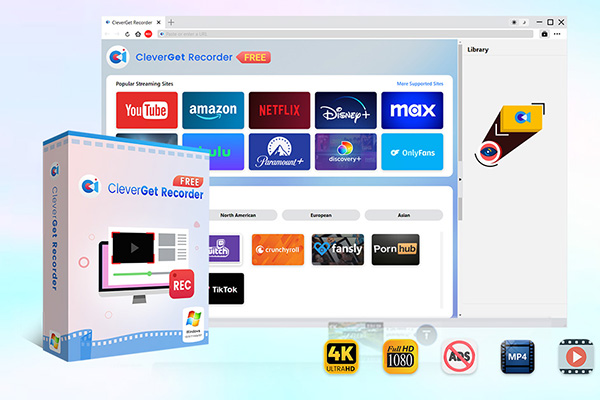
You might find it hard to accept these drawbacks of the YouTube TV DVR, from initially wanting to try recording with the DVR to now hesitating whether to use it. Don’t worry, I have a recommendation for a video recorder to address the DVR’s cons, which is CleverGet Recorder. It is a streaming video recorder with the same functionality as the YouTube TV DVR and can directly record YouTube TV shows for offline viewing. It is free to use and can record DRM-protected content without any retention period on the recorded content. If you’re interested, please continue reading as I share how to use CleverGet Recorder.

-
- 100% free streaming video recorder.
- Record both online on-demand and live streaming videos.
- Record up to 4K 60 FPS video to MP4 or MKV.
- Schedule recording on preset recording length.
- No watermark, no time limit, and ad-skipping (beta).
Step 1: Download and install the Cleverget Recorder.
Step 2: Click the three dots in the top right corner of the interface, then click “Record” and set the format, resolution, etc. according to your personal preference.

Step 3: Open the platform you want to record and find the content you want to screen record.

Part 4: FAQs
1.How many shows can I record at once?
Using a DVR, you can record an unlimited number of programs simultaneously, including live shows, sports events, and other content. There is also no limit to the number of recordings saved.
2.Can I watch recordings offline?
No, cloud-only streaming with youtube TV DVR, but you can use CleverGet Recorder, which is not only supports directly recording YouTube for offline viewing, but also supports recording other streaming platforms, such as record Twitch stream or others.
3.How do I delete a recording?
You need to click on “Library” in the menu, find the recording you want to delete, open that recording, then click the check mark icon and select “remove from library” to confirm. And your recording will be deleted.
4. Do recordings take up space on my device?
The recordings will not take up any space on your device because it will be automatically saved to the cloud instead of your local device.
Part 5: Conlusion
If you want to record YouTube TV, then a DVR is essential, but it has some cons, which may affect your recording. So you can choose the CleverGet recorder to make up for the cons of the DVR.
-

Most Popular Facebook Story Viewers Rank & BeyondPatrick Murray/2026-06-03
-

Is YouTube Smart Downloads Good or You Should Try Something Smarter?Patrick Murray/2026-06-03
-

How to Save Money on Discovery Plus SubscriptionSunny Wen/2026-05-28
-
ScreenRec Review: Is It Truly Free and Watermark-Free?Sunny Wen/2026-05-28
-

Can You Still Get a Free Trial on Discovery+?Sunny Wen/2026-05-20
-
Easy Guide: How to Burn Amazon Prime Videos to DVDs?Patrick Murray/2026-05-09
-
Where Are Amazon Prime Video Downloads Stored on PC/MobilePatrick Murray/2026-05-08
-

Sling TV or FuboTV: Which One Should You Pick?Sunny Wen/2026-05-11
-

Can You Share a Disney Plus Account with Different Households?Sunny Wen/2026-04-16
-
How to Use Loom Video Recorder for Quick Screen RecordingSunny Wen/2026-04-16
-

How to Download OnlyFans Videos from Messages?Patrick Murray/2024-05-09
-

[2026] What is OnlyFans Media not Loading Issue & How to Fix?Patrick Murray/2024-02-21
-

How to Download OnlyFans Videos on Android/iPhone/PC?Patrick Murray/2024-06-28
-

How to Download Private YouTube Videos Without AccessPatrick Murray/2025-02-12
-

How to Download YouTube Members-Only Videos?Cassie J./2024-05-08
-

Latest List of the Best Free Movie Websites[2026]Patrick Murray/2024-05-07
-
[2026 Update] How to Download All Media from OnlyFans?Patrick Murray/2024-02-26
-
TK2DL: Features and Uses of this TikTok & Twitter DownloaderLeia Liu/2024-09-05
-

10 Best HDHub4u Alternative Sites for Movie DownloadPatrick Murray/2024-03-06
-
How to Turn Off Age Restriction on YouTube?Patrick Murray/2024-03-04
