
 Try for Free
 Try for Free
Last updated on 2025-09-25, by
The Ultimate Guide to Recording Facebook Live Streams
Summary:
This guide describes the detailed steps on how to record Facebook Live on Windows and Mac, iPhone and Android respectively. It is accompanied by instruction diagrams, which we hope will be helpful for you.
Every day, there are a lot of bloggers who are broadcasting live on Facebook, and there are often a lot of wonderful moments and interactions in the live broadcast. You may think, can I record the whole live broadcast process, and then view it later? Of course you can! This guide is all about how to record a Facebook live video. We’ll cover the steps to do it on your computer: Windows and Mac; and on your phone: Android and iPhone. And one of the best streaming video recording tools will be recommended for you to perform any recording task in the future. Come explore with us now!

MenuCLOSE
Part 1: How to Record Facebook Live on PC (Windows & Mac)
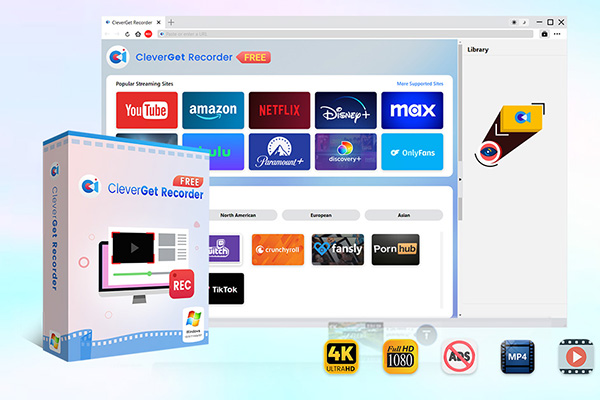
What is CleverGet Recorder?
To say the best way to record Facebook live, it’s still looking for a reliable, video recording tool to record streaming platforms.
And CleverGet Recorder, a free streaming video recorder for both Windows and Mac systems, is the perfect choice. Let’s take a look at the performance of CleverGet Recorder. It can record up to 4K videos, retaining the live streaming quality, original resolution, frame rate, audio sample rate and sound channel. For on-demand content, CleverGet Recorder even lets you record at 1x, 2x, 3x, 4x, or even 5x speeds, which means you can record in one-fifth of the original video length. That’s high quality and efficiency you can count on.

-
- 100% free streaming video recorder.
- Record both online on-demand and live streaming videos.
- Record up to 4K 60 FPS video to MP4 or MKV.
- Schedule recording on preset recording length.
- No watermark, no time limit, and ad-skipping (beta).
How to Record Facebook Live with CleverGet Recorder
After reading the above information, have you been eager to try CleverGet Recorder? Don’t worry about the operation, the most detailed how to record live on Facebook guide is ready:
Step 1. Download and install CleverGet Recorder.
Step 2. Click the three dots icon in the upper right corner to open the Settings window. Here, you can adjust the format, sharpness, frame rate, audio rate, audio channel, etc. of the recorded video. After finishing the settings, click Save to save the result.

Step 3. Now, open Facebook using your browser and find what you want to record. In the top left corner of the video playback screen, near the address bar, you will see a red button called REC. Click on it to evoke the recording toolbar at the bottom of the page.
Step 4. Now, you can complete the recording speed, ad filtering and other settings on the toolbar. After finishing the settings, click the red Record button to start Facebook live video recording.

Step 5. When the recording is finished, click Stop Recording. CleverGet Recorder will save your file locally on your computer. Under the Library option on the right side, click on the icon of the recorded video, and you can find the past recordings.

Bonus: More ways to download Facebook videos
I want to capture online and on-demand videos on Facebook, but recording is too time-consuming, and I’m also afraid of pop-up windows affecting the video. The best answer can be found in CleverGet All-In-One on the same platform.
1. Download and install the program on your device.
2. Go to the main screen. Next, tap on the Facebook icon to enter the app and then search for the video you want to download.
3. CleverGet Facebook video downloader will automatically detect the downloadable video resources on the current page. You just need to choose the output definition, format and other options.
4. Finally, click Download.
Part 2: How to Record Facebook Live on Mobile (Android & iOS)
How to Record Facebook Live on Android
If you are an Android user, the quickest way is to use the built-in video recorder, which is fast to start, and can capture any activities and images on your phone screen, so it can be regarded as a free streaming recorder on your phone.
Step 1. Turn on your cell phone and come to the desktop interface. Scroll down to open Control Panel, and in the menu, you will find a function named Screen Recorder. Click on it.
Step 2. Now, a new pop-up window will appear, prompting you to click Start. After you click on it, there will be a countdown of a few seconds. You can open Facebook at this point and find the live stream you want to record. After the countdown is over, the recording will start automatically.
Step 3. When the recording is finished, click the Stop button. The video you captured will be stored in Photos or Gallery. You can go there to check the result.

To keep the recording result stable, you can:
Turn off notifications on your phone or turn on Do Not Disturb mode so that any app pop-ups won’t block the live stream.
Finish the recording settings in advance. Some Android phone models support adjusting the sharpness and frame rate of recording. Choose high parameters whenever possible.
Make sure the option to record sound is turned on. You can find this block by heading to the Settings App.
How to Record Facebook Live on iOS
The operation method on an iPhone is similar to that of an Android phone; you can use the video recording function in Control Center directly without downloading third-party software from the app store. In this subsection, we will teach you how to do it:
Step 1. Turn on your iPhone and slide down from the top right corner of the screen to open Control Center.
Step 2. You will see a gray circle icon, that represents the built-in video recorder on your phone. When you tap it, it will automatically start a three-second countdown and then start recording. Before you start recording, you may see a small Screen Recording pop-up, where you should remember to select Facebook as the recording.
Step 3. When you want to stop recording, please slide down to open Control Center again and click the red icon. When the recording is finished, your video will be automatically saved in the Photos app. You can view it there.

Things to note about recording on iPhone:
If you don’t find the Screen Recorder icon in Control Center on your desktop, you can open Settings and select Control Centre. Then, select Screen Recording in the Functions in the directory and add it as a shortcut.
On iPhone, you may not be able to use third-party tools. This is because Apple prohibits third-party software from recording the device screen.
Part 3: Conclusion
This guide has given the most complete answer for how to record a Facebook live video. No matter which device you decide to use, there’s a tool for you. If you want to do it on your computer, CleverGet Recorder’s recording features will ensure that you can do it just as smoothly on Windows and Mac, and if you want to do it on your mobile device, it’s very easy to do so – just find the screen recorder that comes with your cell phone and launch it. Especially for people who want to record Facebook live on PC, CleverGet Recorder is certainly worth trying. Its free and easy operation will make your recording experience smooth and wonderful.
-
How to Screenshot on Windows 10/11: Tools & ShortcutsSunny Wen/2026-03-30
-

Does Paramount Plus Have Live TV? Full GuideSunny Wen/2026-03-30
-

How to Download Videos from 9Now?Cassie J./2026-03-24
-

How to Disable YouTube Shorts: Simple Methods That WorkSunny Wen/2026-03-23
-

Hulu Screen Limits: How Many People Can Watch Hulu at Once?Cassie J./2026-03-24
-

From Flight to Hotel: How to Watch Netflix While TravelingCassie J./2026-03-24
-

How to Record on Canva: Step-by-Step Guide for BeginnersSunny Wen/2026-03-16
-

Paramount Plus Error Code 111: Causes, FixesLeia Liu/2026-03-13
-

4K Video Downloader Review: Is It Worth Using?Leia Liu/2026-03-13
-

ScreenPal Review: Is It the Right Screen Recorder for You?Sunny Wen/2026-03-12
-

How to Download OnlyFans Videos from Messages?Patrick Murray/2024-05-09
-

[2026] What is OnlyFans Media not Loading Issue & How to Fix?Patrick Murray/2024-02-21
-

How to Download OnlyFans Videos on Android/iPhone/PC?Patrick Murray/2024-06-28
-

How to Download Private YouTube Videos Without AccessPatrick Murray/2025-02-12
-

How to Download YouTube Members-Only Videos?Cassie J./2024-05-08
-

Latest List of the Best Free Movie Websites[2026]Patrick Murray/2024-05-07
-
[2026 Update] How to Download All Media from OnlyFans?Patrick Murray/2024-02-26
-
TK2DL: Features and Uses of this TikTok & Twitter DownloaderLeia Liu/2024-09-05
-

10 Best HDHub4u Alternative Sites for Movie DownloadPatrick Murray/2024-03-06
-
How to Turn Off Age Restriction on YouTube?Patrick Murray/2024-03-04
